


Manual for usage and creation of the radar meteorological maps![]()
This manual describes and depicts the usage of mySKYwatch website. Basic information about radar meteorology can be found in About our radar outputs at the main page. Website www.mySKYwatch.eu is used for visualisation of processed and interpreted meteorological data obtained from skySCANner radar measurements.
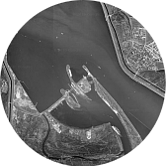
The background map with circle ( figure 1 ) shows the range of radar measurement ( mark 1 and 2 ). The measured data is shown in this circle. The location of the radar is depicted by the red ring ( mark 3 ) which is in the middle of limit circle. It is possible to change visualisation settings by using the tools available on the left side of the website ( mark 4 ). Explanatory notes / GLOSSARY ( mark 5 ) can be found on the right side of the website. These describe the meaning of visualised information in more detail.
Even more detailed description can be acquired by clicking on one of the information icons ( ![]() ) which are located in the CONTROLS and GLOSSARY sections. The header ( mark 6 ) of the website offers information ( mark 7 ) about visualised measurement including geohraphic coordinates at the location of the mouse. The header also contains language settings ( it is possible to set to language of the website to Slovak, Czech, Hungarian, English, German, mark 8 ). In the header there is also a menu which you can use to log off, return to the main page, show this Manual or to use the Demo version of this website ( mark 9 ). In the upper part of the background map there is a pallet ( mark 10 ) which is used to interpret the colours shown in the picture.
) which are located in the CONTROLS and GLOSSARY sections. The header ( mark 6 ) of the website offers information ( mark 7 ) about visualised measurement including geohraphic coordinates at the location of the mouse. The header also contains language settings ( it is possible to set to language of the website to Slovak, Czech, Hungarian, English, German, mark 8 ). In the header there is also a menu which you can use to log off, return to the main page, show this Manual or to use the Demo version of this website ( mark 9 ). In the upper part of the background map there is a pallet ( mark 10 ) which is used to interpret the colours shown in the picture.

Figure 1 : The localisation of components on the website
1. LEFT SIDE - CONTROLS
1.1 OBSERVATIONS AND FORECASTS
In this section the current list of radar measurements ( on the list it is depicted with the grey colour ) and forecasts ( on the list depicted with yellow colour ) can be found. Normally, there are the observations for the last two days ( 288 items ) and forecasts for the next hour ( 6 items ). The number of forecasts can be lower depending on the character of measured data ( for example by NRE - look further in text for explanation ). The current visualised measurement is always highlighted and underlined.
Clicking on the entry on the list shows data from selected date and time which is in UTC ( Coordinated Universal Time ). The difference from Central European time, the time difference is -2 hours ( during summer time ), resp. -1 hour ( during winter time ). For example the measurement shown on the list as 21. 9. 2011 07:00 is 21. 9. 2011 09:00 Central European Time.
The measurements on the list update automatically. In the course of standard operations a new measurement will happen every 10 minutes. The user will see an alert message pop up in the lower right corner of the background map which signalises a new measurement. It is not necessary to refresh the website. By refreshing all currently selected options/settings will return to initial state. For a different measurement visualisation options please see the ANIMATION section.

Figure 2 : The RMO object observation with various parameters
1.2 OBJECT PARAMETERS - RMO
The term RMO ( Radar Meteorological Object ) is used for a part of the cloud which can be detected, resp. "seen" by the radar. It is possible because the electromagnetic radition ( in our case microwaves ) scatters ( in a more plain term they bounce back/rebound from ) in the droplets that make up a cloud, resp. precipitation. The radar will not intercept a weak "bounced back" signal. RMO also has a cell in which the weather is "cooked".
Under the measurement list there are buttons which you can use to choose various types of information ( layers ) from the selected measurement ( Cloud RMO top heights, RMO density distribution - Base reflectivity, Precipitation intensity, Hailstorm, Cell top heights, Cell evolution tendency, Significant cell phenomenon ). After selecting one of the options corresponding information will pop up inside the limit circle. In the upper part of the background map a corresponging pallet will pop up which you can use to assign values to shown colours.
Notes :
- you can use the assign function when TRANSPARENCY is at 0% ( for more information look in 1.4. section )
- you can choose only one of the three options that are above the line, from the rest under the line it is possible to visualise as many as you wish.
1.3. RADAR RAINFALL TOTAL
To visualise an estimate of the rainfall total during a specific time segment you can use the RADAR RAINFALL TOTAL. If you wish to visualise a specific rainfall total with a desired timeperiod ( From : / To : ) simply click the RADAR RAINFALL TOTAL button/option. By clicking on the From button: you can choose the starting date and time and by clicking on the To : button you can choose the ending date and time. You can confirm your chosen preferences by clicking the Visualise button which will show the desired data and a corresponding pallet. The pallet will change accordingly to the calculated ranfall total.
For a better application orientantion clicking on the RADAR RAINFALL TOTAL will hide the control tools for OBSERVATIONS AND FORECASTS. These can be later accessed simply by clicking the OBSERVATIONS AND FORECASTS button ( this will hide the control tools for RADAR RAINFALL TOTAL ).
Under the RADAR RAINFALL TOTAL there are all the layers common to all types of visualisation - Radar location and circle limit. You can turn their visualisation on and off in this section.

Figure 3 : Choosing and visualising the radar rainfall total
1.4 TRANSPARECNY
TRANSPARENCY is used for a better orientantion of the visualised data. By using this option it is possible for each visualised layer ( see 1.2 OBJECT PARAMETERS – RMO ) to define its own level of transparecny ( 0% - non transparent to 100% - completely transparent ). You can use the Layer option to choose the layer in which you wish to change transparency. The Value option is used to set concrete value of transparency of the selected layer.

Figure 4 : Application of transparency
1.5 ANIMATION
In ANIMATION section you can set and run an animation of the consecutive measurements. In row/line From - To ( mark 1 ) you can choose the time period of the measurement you wish to animate. In row Interval ( mark 2 ) you can choose the interval between inividual measurements of the the animation. In case of slow internet connection it is advised to set the time interval to a higher value for a smooth animation.
Chosen time frame can be managed with the First picture ( mark 3 ), Previous image ( mark 4 ), Run animation ( mark 5 ), Stop animation ( mark 6 ), Next Image ( mark 7 ), Last image ( mark 8 ) buttons. These options always work within the chosen time period in row From - To, NOT with the entire list of measurement.
For your convenience selecting the measurement in OBSERVATIONS AND FORECASTS section will automatically set the time period From - To to the next hour from the selected measurement. This segment can be adjusted using the arrows located on both sides of the time period row.

Figure 5 : Animation Control
1.6. MAP
In this section it is possible to choose the background map. There are various types of map available from Google, Bing, OpenStreetMap ( OMC ), simple WMS ( Web Mapping Services ), so called "none map" - black background and a custom map in shades of grey. You can use these options in case the visualised data is not clearly readable on a specific type of map, if you are accustomed to using a particular type of map or in case of slow internet connection ( in this case it is advised to use the so called "none map" option ).
1.7. SEARCH
This section is used to search in the background map. It is possible to use one of three types of search - according to the co-ordinates in degrees and minutes, according to the co-ordinates in tenth of degrees or according to the name ( cities, municipalities ... ). After inputing the co-ordinates and pushing the Search button the background map will center itself to desired location. If you are searching by name a red dot will appear at the corresponding locations. You can remove the red dot by clicking the Delete button ( on the left side of Search button ).

Figure 6 : Search by name
1.8 TOOLS
In this section it is possible to draw in dots/points, lines and to measure the distance in the visualisation. Drawn in dots and lines can be removed from the image using the Delete button. When measuring distance the uses chooses the route/path he/she wishes to measure by clicking. The consecutive distance is shown right under the Measure the distance button. It is possible to finish the drawing of lines and distance measuring simply by double clicking. At that point the last drawn line will finish.
After concluding your use of these tools it is necessary to use the Map movement item. Click and hold the left mouse button on the map.

Figure 7 : Distance measurement
2. MIDDLE SECTION - METEOROLOGICAL RADAR MAP WITH MEASUREMENT
You can use the control tools in the upper left part of the map to zoom in and out. However it is more convenient to move in the map by clicking and holding the left mouse button and to zoom in and out you can use the middle mouse button.
In the upper left corner of the circle limit you can find the information on which type of the visualised data you are currently using - OBSERVATION AND FORECAST. There can be NRE ( No Radar Echo ) inscribed in the upper right corner of the limit circle - a situation when the radar did not detect any relevant data. There also can be NIL inscprition in the upper right corner of the circle limit - this means that the radar has technical difficulties. In this case there may be clouds in the radar observation range but the radar is not measuring them and consequently no measured data can be visualised. If the upper right corner of the circle limit is empty a standard measurement is taking place.
In the upper part of the map there is a pallet which you can use to assign values to the colours in the measurement image. This pallet changes accordingly to the selected type of data in Object parameters - RMO section.
3. RIGHT SIDE - EXPLANATORY NOTES / GLOSSARY
In the right side of the application there is a column with explanations which describe in more detial the individual informations and icons that can be seen within radar output.
We wish you a pleasant work when using the mySKYwatch application. Don't forget that the website is also optimised for mobile phones, smartphones and tablets.
Mobile version of the mySKYwatch website
